Today we’ll learn How To Do WordPress Settings: Most Important Settings For Beginners What are the benefits of setting up the website? So know Step by Step
Friends, if you are a beginner, then after the installation of your WordPress, the most important thing for you is to set up your blog. So that your website can grow quickly and rank in Google Search Engine.
Friends, Beginners do wrong setting in their blog from the beginning so that their website can not grow, today I will tell you about everything from General to Advanced, Step by Step in this post of WordPress Dashboard Setting.
So that it can be easy for beginners to set up their blog. But I will also tell you the setting to win, that I myself have seen by doing practical.
How To Do WordPress Dashboard Setting?
Setup 1 General :-

To set up our blog or website, we first have to set the General Option, then all the other settings have to be done.
| A » Site Title: – In this function, to do the general setting of our blog or website, first of all we have to give the title of our site, you can click on it and give the title of your site. |
| B » Tagline: – In this option of General, you have to write a short line for your blog, you fill that line in it for your blog. |
| C » WordPress Address URL: – This column already contains the URL of your blog’s homepage, you do not need to change it, let it remain the default. |
| D » Site Address URL: – In this you will get the URL of your homepage, you do not need to change it, let it be as you are. |
| E » Administration Email Address: – In this option, you can give an email of yours, if there is no email, then you can create and enter your own email address. |
| J » Date Format: – In this you can select the date of your website so that the day you post, it shows on the same day. |
| K » Time Format: – In this option you can set the timing of your post so that your post shows the same time as you post. |
| F » Membership: – If you want to login for Comment on your blog or website, then tick this option, if you do not want to do, leave this option as Untick. |
| G » New User Default Role :- In this option you do not need to do anything, let it remain as it is. |
| H » Site Language: – In this option you have to choose the language according to you, in this you can select the language according to you. |
| I » Timezone :- In this you need to set timezone according to your country, this makes it easy to rank your post, if you live in India then you need to select Kolkata’s timezone . |
Setup 2 Writing:-
Come friends, let us also know some things about the second option of our setting i.e. writing. You get many functions in writing, which you have to set up.
| A » Default Post And Categories: – With this, you can select your categories in this option, because when you publish or edit your post, you can change your categories on it.
By setting the categories, our blog can be divided into part by part of the post so that the user can easily read the post of that method. It also helps our post in Google Ranking. |
| B » Default Post Format: – In this option, many types of things are given like, Standard, Aside, Chat, Gallery, Link Image, Quotes Etc, out of which we should keep the format of our post as standard.
In this, most of the post formats are standard, if you want to change the format of your post, then you can change your format by going to the default post format. |
| C » Default Editor Form All Users :- There are two types of posts in this Classic Editor and Block Editor. Let the Default Classic Editor remain in this, it makes your post attractive. |
| D » Allow Users To Switch Editors: – When we do our post, there is a panel in the top side which is called Editor, if we want to show that panel then yes if we want to show no then select on No. |
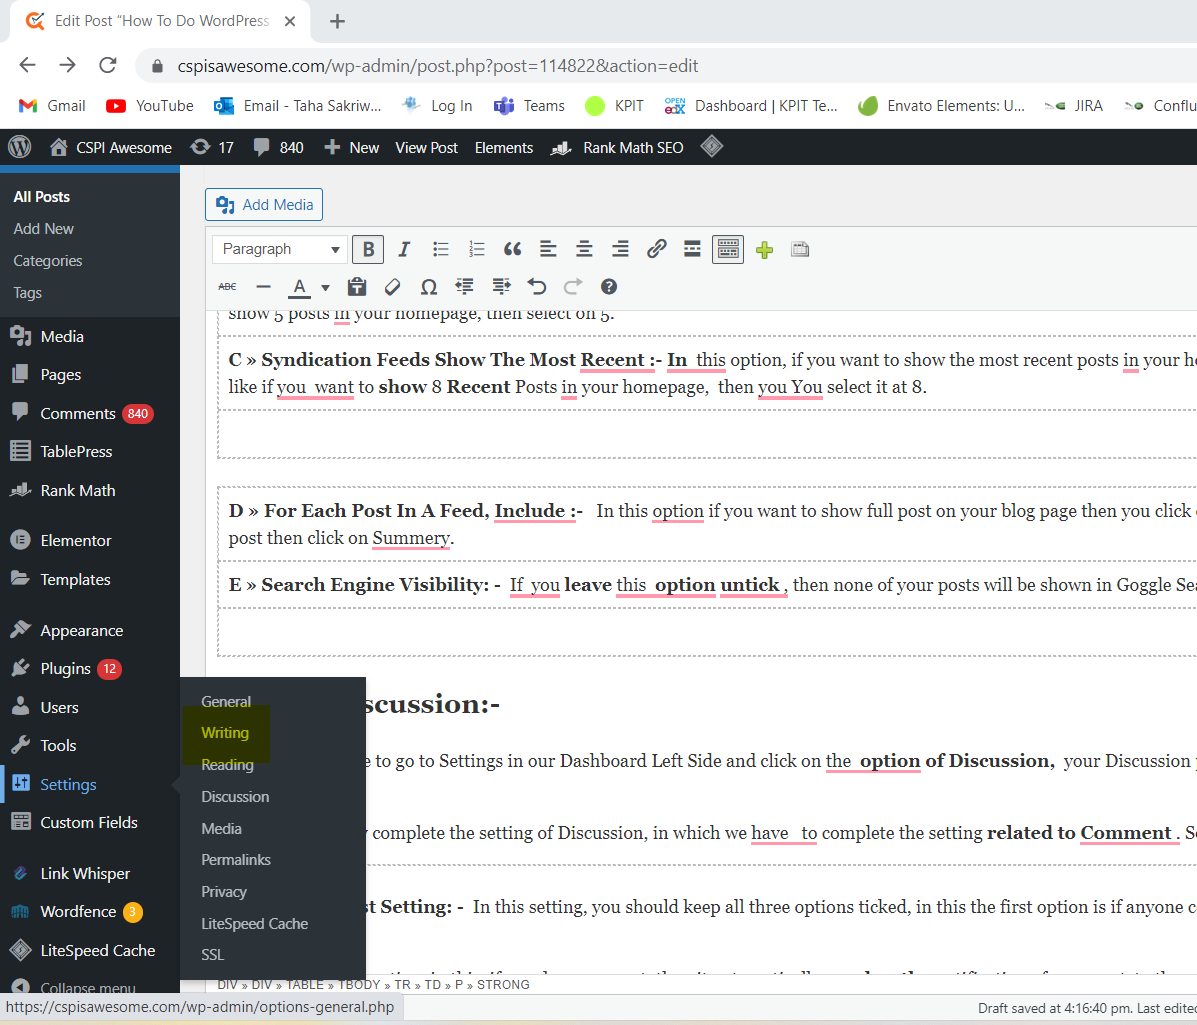
Setup 3 Reading :-

Third friends setting Setup the Column to you to go to his Left Side Setting Reading Option After Click on Appka Reading of Setting Open or will open.
So friends, let’s learn about its setting so that you will be able to do its proper setting, let’s teach Step by Step.
| A » Your Homepage Displays: – In this option , if you want to show your latest post above in your homepage, then you select Latest Post , if you want to show your homepage by designing yourself then you select on Static Page Do. |
| B » Blog Pages Show At Most :- In this option, if you want to put any number of posts on your homepage, then you can set it from here, like if you want to show 5 posts in your homepage, then select on 5. |
| C » Syndication Feeds Show The Most Recent :- In this option, if you want to show the most recent posts in your homepage, then you can set it from here, like if you want to show 8 Recent Posts in your homepage, then you You select it at 8. |
| D » For Each Post In A Feed, Include :- In this option if you want to show full post on your blog page then you click on Full Text, if you want to show Export post then click on Summery. |
| E » Search Engine Visibility: – If you leave this option untick , then none of your posts will be shown in Goggle Search Engine. |
Setup 4 Discussion:-

First of all, we have to go to Settings in our Dashboard Left Side and click on the option of Discussion, your Discussion page will be opened. From there you can set it.
Friends, let us now complete the setting of Discussion, in which we have to complete the setting related to Comment . So let’s learn Step by Step.
| A » Default Post Setting: – In this setting, you should keep all three options ticked, in this the first option is if anyone comments on your post, then it notifies you.
There is a second option in this, if you do a new post, then it automatically reaches the notification of your post to the people, and the third option is if you tick it, then your new post visitors can comment . |
| B » Other Comment Setting: – To set this, by ticking the first option, the visitor will have to give his name and email for the comment, by ticking the second option, Vistor will have to login to your site to comment .
It is also the number of days you Timing of Third Option R Tick since the days Comment Delete be cast. |
| C » Email Me Whenever: – There are two options in this to set it, by selecting the first option, anyone can comment on your post, and by selecting the second option, you do not publish that comment until Till then it does not show on your post. |
| D »Before A Comment Appears: – its setting Liyeisme to two Option which initiatives does Comment Option on your post Visitor from to Select Them Show Hoan think and another of Visitor to Select the Option Comment First Approved be needed. |
Setup 5 Media:-

Go to Setting on the left side of WordPress Dashboard and click on Media’s setting, in this you should set the size of your image according to your own, so let’s start doing all the setting of your media.
| A » Thumbnail Size: – In this option, you can easily setup the Height and Width of the size of your Small Images . |
| B » Medium Size: – In this option you can easily setup the Height and Width of the size of your Medium Image . |
| C » Large Size: – In this option you can easily setup the Height and Width of the size of your Large Image. |
Setup 6 Permalinks:-

You know when to setting you going to Setting the Left Side of your Dashboard Permalinks must Click on the Option, after you’ve Click Permalinks settings will be Page Open in. You can set your URL from Uyaha.
So let’s start by properly setting related to your URL so that you can create a unique URL, so let’s teach Step by Step.
Common Setting: – In this setting, you can give the name of the date and post along with your homepage, let us know about it one by one.
| A » Plain :- In this, if you want to give just the URL of the homepage in every post, then you select this option. |
| B » Day And Name :- In this, if you want to give date in all your posts between Homepage and Post Name , then you select this option. |
| C » Month And Name :- In this, if you want to give Month Name between Homepage and Post Name in all your posts, then you should select this option. |
| D » Numeric: – If you want to give number in front of your homepage and post name, then you select on this option. |
| E » Post Name: – In this, if you want to give only Post Name with the URL of your homepage, then you select on this option. |
| F » Custom Structure: – In this, the option you tick above gets automatically selected and you can set whatever you want to show in front of the homepage according to it. |
Setup 7 What Is Privacy:-
Friends will come now we do it too Setting to its setting in the Left Side you go on Setting to Click on Option’s Privacy K So let us also learn its setting.
| Change Your Privacy Policy Page: – In this option, you can select your Privacy Page and you can create a new page in it. |
Final Word :-
Friends, I hope you like our WordPress Dashboard Setting Post. Must have liked the post and you must have learned from it.
Friends, if you are still facing any problem and you have not understood any part given in the setting of the WordPress dashboard, then you must tell us the comment black.
Friends, if you want to read more posts related to WordPress. If you want to learn more, then you must visit our other posts once, I hope that you will definitely like my other posts. And you will get to learn something new.